Please let me know if you have any comments or advice to add. Thanks!
First and foremost, plug directly into your router with an Ethernet cable, rather than using wifi. I need an adapter like this for my Macbook Pro.
In order to have a movie run as smoothly as possible on viewers screens, reduce the size of the movie, and send only a portion of your screen. The size doesn’t need to be exact, but approximately 850×480 looks good. This results in far fewer pixels being transferred, than using full screen.
The Mechanics:
- Hit the big green Share button in the control ribbon.
- Choose “Advanced” which is the middle tab at the top of the window.
- Choose “Portion of Screen”.
- Check “Share computer sound” and “Optimize Screen Share for video clip” at the bottom of the window.
- Click “Share” at the bottom right.
- You can hold the top thicker green bar of the share box to drag it around, and size it using the thinner sides and bottom, and also the bottom two corners.
- With Quicktime, I found out that I could click the Quicktime icon at the bottom of my monitor in order to bring that process to being active, then click the spacebar to start the movie. Or you can move your cursor into the green box and try to click the start triangle. It takes practice and patience, because sometimes it doesn’t work. I haven’t got it fully figured out yet. One thing that seems to work in an emergency is to size the green box smaller at the bottom, click the start triangle, and then size the green box down again. It takes practice. Make sure to have a few practice runs with friends first.
- You can move the cursor into the green box and adjust the volume if necessary or use other controls. Remember to leave your cursor out of the box, so the controls disappear from on top of the movie.
- When the movie is over, click the red “stop share” button.
- Try not to touch your computer while playing a movie. If focus is taken away from Quicktime or Zoom, then the share will pause or stop.
Diagnostics:
In the Zoom settings there is a statistics window. Click on the green shield in the upper left of your window to bring it up (or you can also get there by starting audio settings and click on statistics down the list on the left). In Statistics, go to the Screen sharing tab at the right hand end while you are playing a movie, and your friend can also go there while receiving the screen share from you. There you will see the bit rate for sending/receiving.
Using Google Slides to play movies:
If you are doing a long broadcast, Google Slides is a convenient way to put the entire broadcast in one place and progress through the broadcast. When getting to the slide with the movie, share the Zoom screen using “portion of screen” as explained above. The movie will be in the same place for every slide so you can get the green box sized in advance. You shouldn’t have to fiddle with the size after doing the share. The tricky part is pressing the start button as once Zoom has the portion of screen highlighted, sometimes the computer doesn’t seem to want to let you click the slide behind the window. You might also have to change the resolution as it looks better in 720p, than in 360p. Once running the quality is very good. The YouTube video playing engine is being used when playing from Google slides and it is very good at adjusting for computers’ limitations. One thing I intellectually think should be a problem is that as the source computer you are simultaneously downloading the video to play on your computer and uploading the portion of screen. In actuality, that doesn’t seem to be a problem – probably it is downloaded in one giant chunk before playing? I don’t know.
Use Quicktime to play movies:
An advantage to using Quicktime is that you don’t have to have a browser, which uses a lot of computer resources, open on your computer. Quicktime pulls the movies from my computer instead of online. Make the screen small, similar to the Google slide size, and use “portion of screen” when broadcasting as explained above. You should also prioritize the Quicktime process as shown below for Zoom.
Playing multiple movies:
Start them all ahead of time and line them up to the same green box area. That way when you start your movies during the live broadcast the green box will default to the correct place and you shouldn’t need to fiddle with it. The movies should start up in that same default place if you’ve prepared it properly.
Prioritizing Zoom:
I have found that stopping as many processes as possible on your computer and then prioritizing Zoom (different methods for Windows vs Mac) helps keep everything running smoothly.
Steps to take before each session:
- Look at the “Activity monitor” and write down the PIDs for the Zoom process, for Manycam, and ManyCamVideoDeviceAgent (if you are using Manycam). Also look at what processes are taking CPU cycles or Memory and shut those down if possible (example, Google backup and sync, Dropbox, Photos, Messages, Chrome, VLC, etc.).
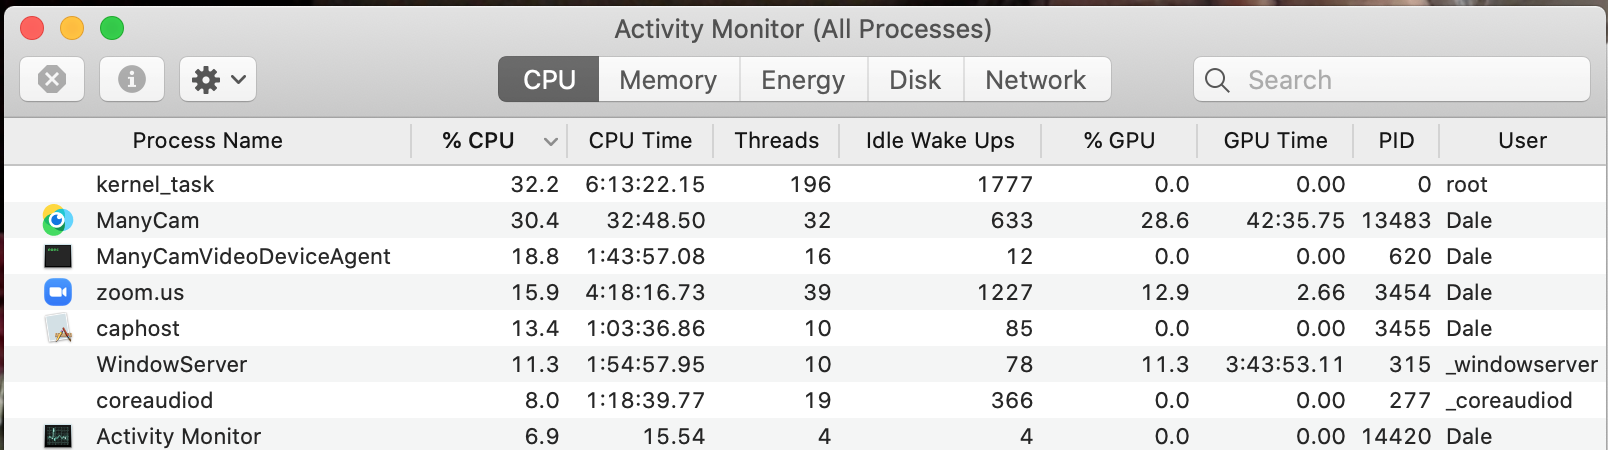
- Change ManyCam and Zoom to high priority in a Terminal window.
To change to high priority: sudo renice -1 -p 13483 620 3454 (using PIDs in the activity monitor above)
Generally: sudo renice -1 -p pid1 pid2 pid3… (you will need to enter your Mac admin password)
reference: https://www.techrepublic.com/article/how- to-adjust-cpu-priority-using- apples-terminal/

Leave A Comment